|
Wonderland Adventures Editor
TUTORIAL 2
Tweaking Tiles and Objects
For our second tutorial, let’s create a new adventure using some of the advanced options.
Again, load up the 3D Editor. Let’s start by reducing the size of the level to 15x15 (from its default 40x40). Both the Width and Height lines have arrows to their left and right. Left-clicking on the arrows will always increase the Width/Height, right-clicking will decrease it.
In particular:
Left-clicking on the arrows to the left of the width will add tiles to the left side of the level.
Left-clicking on the arrows to the right of the width will add tiles to the right side of the level.
Left-clicking on the arrows to the left of the height will add tiles to the top side of the level.
Left-clicking on the arrows to the right of the height will add tiles to the bottom side of the level.
Right-clicking any of the above will delete a row/column of tiles from the indicated side.
(Side note: when adding tiles to a side, there are two options - using the currently select tile, or duplicating an existing row/column - the “BORDER CURRENT/BORDER DUPLICATE” button allows you to make that selection).
For an empty level, it doesn’t matter, so right click on any of the arrows until the size is reduced to 15x15.

Next, move to the global settings below the size. The first line is weather... click to cycle until you get “Rain”. The next line is music... click to cycle until you get “Dark/Sewer”.
The next line (“LEVELTEX”) is the texture to use for the level. Left-Click to cycle through available textures... you’ll see the level changing in the viewer... until you get to the dungeon/cellar texture. We’ll leave the other settings as they are for now.
Note: don’t right-click on the LEVELTEX button yet - this will go into the advanced custom texture option.
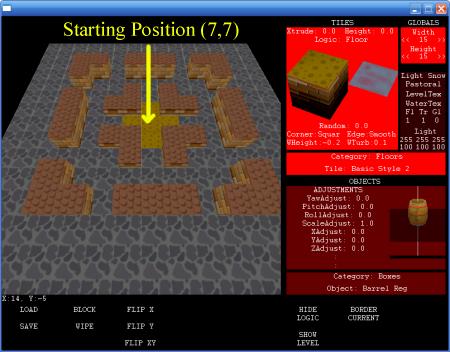
Now, use the basic tile selector and select a basic Style 1 0.5 Height Wall and 1.0 Height Wall to draw the following pattern. Use the coordinate viewer to ensure that the center of your structure is the position (7,7) which we will use as our starting position (so write it down on your pad of paper). I have used Height 0.5 for the inner walls and Height 1.0 for the outer walls. Then I select the Floor Style 2 to draw the sandy floor portion at the center of the structure.
Got the above level?
Now we will modify a tile to try out some advanced options. You just drew the sandy center of the level. We want to make the transition from cellar floor to sand floor nicer.
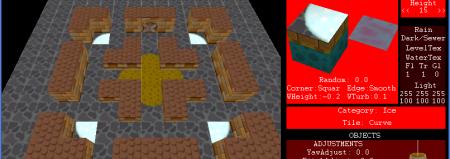
Move the cursor to the position X=7 Y=9, i.e. two spots below your starting position. Right-click on that tile. You will see the sand floor tile in your Advanced Tile Tweak Viewer change back to the cellar floor tile: Right-Clicking a tile “picks it up” and selects it as your tile for current use.
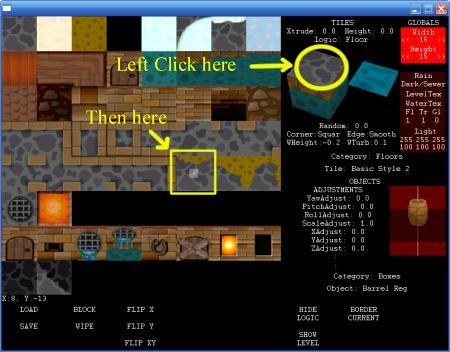
Now, we want to change this tile a little. Left click on the top part of the Tile in the Tweak Viewer (yellow circle in picture below). This allows us to change the top texture of that tile. The Editor View will change and show a grid of available textures. Choose the straight “sand to cellar transtition” texture (yellow box).
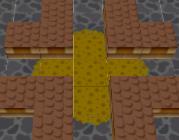
Alright, place this tile at position (7,9) and you have a nice transition. However, if we try the same thing for the other four sides, it doesn’t look right, since the texture isn’t “turned” in the right direction. No problem, this time we right-click on the top part of the Tile Tweak window... this rotates the top part of the texture. Rotate and place the remaining three transitions.
Your result should look as follows:
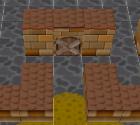
We can do the same thing for the sides of walls. Right-Click to “pick up” the wall at position (7,3). Left-Click on the side of the tile in the Tweak Viewer, select e.g. the “boarded up door” texture, then place the modified tile at (7,3).
Finally, let’s place some Ice Corners to slide around a little. From the basic Tile Selector, select Category “Ice” and Tile “Ice Corner”. Place in the upper/left corner, then right-click on the top of the tile in the Tile Tweak Window to rotate the corner into the other three positions.
We’ve only looked at selecting and rotating top/side textures of a tile - clearly there are other options in the Tile Tweak Window. Let’s leave them for now.
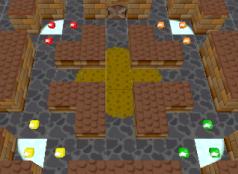
Next, let’s try some basic tweaks with object. In the Object Selector, select Items/Gems again. Place a few gems, then click on the “Colour” line to change the colour of the gem, and place a few more. Try placing twelve gems as shown in the given colours:
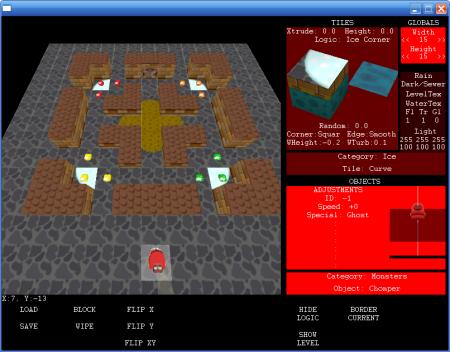
Let’s do one more thing. In the Object Selector, go to the Monster Category and select the Chomper. We will tweak the “Special” line for this one, and set it from “----“ to “Ghost” (the ghostly chomper can travel through gems). Place it at position (7,13).
All done. Save the level as TUTORIAL2/1 and exit.
Now load the Master Editor, give the adventure a name and description, set the starting coordinates to (7,7).
You’ll note that we don’t have a star in this adventure. We want this to be a “coin collecting” adventure, so set the Adventure Goal to “Collect All Gems”, then save the master file as “TUTORIAL2”.
Well done, you can now go and play this adventure in the player.
| |

