|
Return to Wonderland
Level Editor
Tutorial #1 - Our first Level!
Welcome to the first Tutorial. We will begin by going through
the process of creating a very simply level, start to finish. Follow these instructions carefully, and step-by-step. You might wish to have both this Tutorial and the Level Editor open at the same time, or print out these pages to keep for easy reference while you use the Editor.
First, load up the Level Editor (either from the desktop or from
within Return to Wonderland) and select "New Level".
The main editor window will appear as follows:
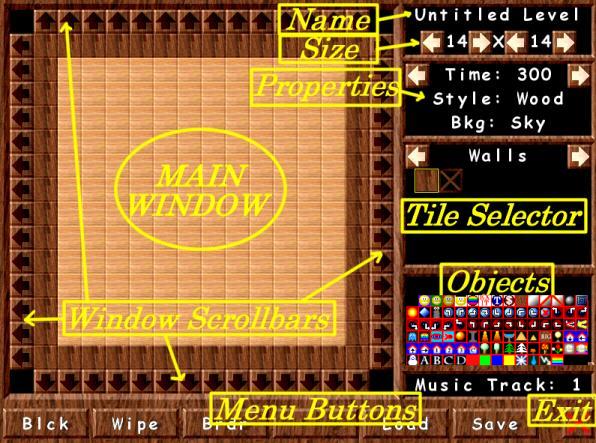
Don't click anything yet!
Let me just quickly point out some important features:
1. The large square area "Main Window" is your work area - this is where you will design and view your current level.
2. The rectangle on the right side allows you to change level characteristics (its name, size, and properties) and select individual level components (tiles and objects).
3. The bottom rectangle contains various menu buttons. Each of these buttons performs a particular function.
OK, let's decide to place some "tiles". Tiles are pieces of the level that stay firmly in place, such as walls, floors, water, ice patches, and so on.
Tiles are placed into categories. To cycle through the categories,
left-click on the arrows to the left or right of the category name (currently "Walls"):

Cycle through once or twice and return to the "Walls" category. You'll notice that some categories only have one entry (e.g. "Water"), while others have many!
Let's place some tiles. With the "Walls" category selected, left-click into the Main Window. You'll see that a wall is placed. To erase a wall, select the "Floors" category and simply place a floor in the spot where you no longer want a wall. Each position in the Main Window can only be used by one Tile, so placing a Floor-Tile onto a Wall-Tile will erase the Wall-Tile.
Now, by selecting "Walls" and "Water" (and "Floors" to erase mistakes) duplicate the following Level:
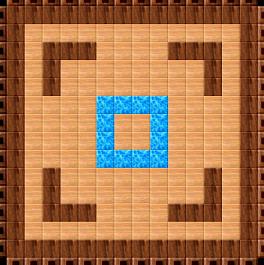
Got it? Excellent!
Now let's place some Objects. Objects are game elements that can
move, be moved, or otherwise be interacted with, such as Stinky and Loof, Boxes, Coins, Monsters, and so on.
We will place three objects: Stinky (yellow circle), a box (red circle) and the level exit (green circle).
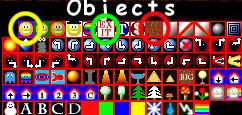
Left-click on Stinky, then place Stinky by clicking on a position in the Main Window.
To erase an object you don't want, select the "empty" object (to the left of Stinky) and click at the location where you wish to erase the object. As with Tiles, each level position can only be occubied by one Object.
Select and place these three objects in your level as follows:
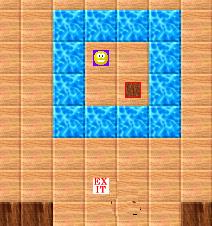
Erase any mistakes using the empty object slot. Make sure you don't, for example, place two Stinkys.
We now have a (very simple) level ready. Stinky will have to push the box into the water to form a bridge, and can then reach the level exit.
Let's finish it off so we can play it!
First, let's name this level. Left-click on the Level Name (currently "Untitled Level") in the upper right corner.
A new window, the text editor, will appear:
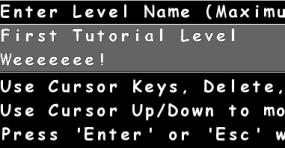
Press the "Delete" key to erase the current name, and type in "First Tutorial Level". To get to the second line, do not press "Enter" (this will accept the current name and return you to the Editor) but rather press the "Cursor Down" key. On the second line, enter "Weeeeee!" (hey, why not?). A level name can have up to two lines. Now press "Enter" to accept the new name and return to the editor.
Finally, we have to save the level! Never forget that!
To do so press the "Save" menu-button in the lower right corner. Another text-editor appears. Type in "TUT1" as the level name and press enter.

The level is now saved, and done. Press the Exit Button (the red "X"). A reminder will appear (yes, we did save). We can now exit the level and return to the game.
Re-start the Return to Wonderland game. Select your player, then select "Play Custom Level", and there it is - "TUT1" is available to be selected.
Congratulations, you've just made your first level! That wasn't too bad, was it? (and kinda fun too!)
Ready for the next tutorial? Click here!
| |

